¶ Tools
The tools drop-down gives the user quick access, from any screen, to Units, SideKick, Equipment and Materials.
¶ Units
Under this tab, the designer can select the units used to display any value in StrinGnosis®. It is possible to use any mix of Imperial and metric units, or to select All Metric or All US values with the press of a button.
Precision settings can also be adjusted here. The well designer can specify the number of decimal places with which nearly all values in StrinGnosis® are displayed.
¶ SideKick℠
SideKick℠ is a very powerful utility that the designer can pull up from anywhere within the program. It provides three principal functions:
- Wellbore Schematics
- MD TVD Calculator
- Fluid Calculator
- Pipe Dimensions Calculator
Wellbore Schematics
The wellbore schematic actively updates as the wellbore is defined. This gives the designer an instantaneous depiction of the wellbore being defined. In this format, it is easy to pick out critical design features such as the top of cement, a cross-over depth or the fluid type in a given annulus.
If the Completion features are licensed, a version of the schematic is available that shows where the completion tools appear on the tubing string.
A slide-out menu of configuration features is available on the right side of the schematic. There, the user can:
- Determine what annotations are shown
- Control all image properties such as line weights and colors, etc.
- Enable or disable labels for naming the annuli
- Enable or disable display of salt layers
- Draw the wellbore in a full or half well format
- Choose the font type and font size
MD TVD Calculator
This utility allows the well designer to input any measured or true vertical depth and instantly see all the depth-related information for the wellbore displayed in the specified units. Specifically:
- x-coordinate (N-S)
- y-coordinate (E-W)
- Dog Leg Severity
- Inclination
- Azimuth
- Fracture Gradient
- Pore Pressure
- Undisturbed Temperature
Fluid Calculator
This utility allows the well designer to quickly calculate fluid properties for three types of fluids.
- Water
- Gases
- Black Oil
The water property calculator returns the properties of water for any set of pressure and temperature specified. The Gas calculator will give the gas's properties for Methane, the default gas assumed in StrinGnosis®, when pressure and temperature are specified. The Black Oil calculator will return the properties of the gas and the oil phases, given the gas gravity, the oil's API gravity and the Gas Oil Ratio (GOR) in addition to the fluid's pressure and temperature.
Pipe Dimensions Calculator
This utility provides the well designer with several commonly used formulas for quick calculations.
- Tubular Area (inner and outer) = π (diameter/2)²
- Cross-Sectional Area = π ((outer diameter/2)² - (inner diameter/2))
- Pipe Density = (Pipe Weight) / (Cross-Sectional Area)
- Moment of Inertia = π/64 ((Outer Diameter)4 - (Inner Diameter)4)
- Weight = Density * (Cross-Sectional Area)
- Wall Thickness = (Outer Diameter - Inner Diameter) / 2
- OD to WallThickness = (Outer Diameter) / (Wall Thickness)
- Axial Stress = (Axial Force) / (Cross-Sectional Area)
¶ Equipment
¶ Overview
In order to choose equipment to be used in a well design, the well designer must enter information about that equipment into the StrinGnosis® database. This input is done here in the Equipment tab, where the designer can describe the Tubulars, Grades, and Connections that the well design requires.
StrinGnosis® also provides some default equipment for the well designer: all commonly available API tubulars, grades, and connections are pre-populated in the respective lists, and data about the connections available from many major connection manufacturers is also available under the Connections tab.
Whether pre-defined or entered manually into the database, these components are then available to the designer via the casing program for all projects.
When the project is saved, information about all equipment being used in the project is also stored in the project file. This way, the well designer can send a StrinGnosis® project to a colleague and that colleague has all the equipment information at hand, without needing to also have access to the designer's database.
However, it is possible that conflicts can occur. It could happen, for instance, that the designer creates a grade that has the same name as a grade on the colleague's computer, but different parameters.
¶ Detecting Grade or Connection Conflicts
When StrinGnosis® opens a project file, it scans the project and compares all grades and connections to the database. If it finds a grade or connection that is not present in the database, it adds it to the database. If it finds a match, no action is required. But if a grade or connection partially matches the version in the database, StrinGnosis® flags that component as a conflict.
Conflicts are listed in one of the two Conflict tabs on the Equipment window. Additionally, an extra icon appears on the toolbar in red – a red Grade icon if a grade conflict is detected, or a red Connection icon if a Connection conflict is detected.
¶ Resolving Conflicts
To resolve a conflict, click on the conflict icon. This brings up the list of conflicted equipment components, so the user can inspect the nature of the conflict. The first column in the table contains a description of all elements of the component where mismatches were detected. The user can then click over to the Grades or Connections tab to compare the conflicted component with the database version, and so determine which version to use.
The project versions of the conflicted components are marked with the suffix " (Project)" on the name so the user can easily identify which items were from the project file as opposed to the database.
¶ Resolving Conflicts using the Database Version
At the time the project is loaded, StrinGnosis® uses the version of the component from the project file (the one with the " (Project)" suffix). If the designer determines that this is not the correct version, but rather the database version should be used, the designer must then open the Casing Design tab, find the string section where the conflicted component is being used, and choose the database version from the dropdown (the component with the same name, but without the " (Project)" suffix). This will resolve the conflict in favor of the database version.
¶ Resolving Conflicts using the Project File Version
If, on the other hand, the user determines that the version in the project file is the correct one, he needs to add that version to the database. There is a button at the bottom of the Equipment form Conflicts list for this purpose. A window comes up showing the component's parameters where the user must enter a new, unique name for the element. Upon clicking Save, the designer saves the element to the database. This procedure resolves the conflict in favor of the project version.
¶ Defining New Equipment Components
Selecting Equipment from the Tools menu brings up a utility that enables the designer to define custom tubulars, grades and connections.
In all three of these tables, the default entries that are shipped cannot be changed; this is indicated by the gray background color. User-defined entries are indicated by their white background. The user can edit one of these user-defined entries by double-clicking on it or by right-clicking and selecting Edit. Grades and connections can also be copied, via the right-click menu item "Copy Record".
Tubulars
A custom tubular can be added by clicking on the "Add" button while the Tubulars list is open. Doing so brings up an input screen where the OD, Unit Weight and Wall Thickness are entered. Once entered, the utility will display a number of corresponding section properties, including the computed inner diameter, the ratio of the wall thickness to the outer diameter, and cross sectional areas.
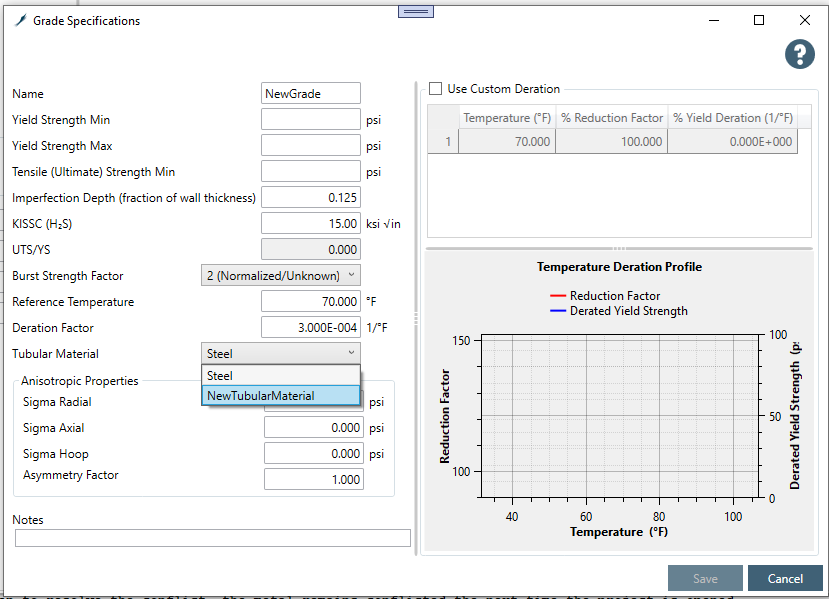
Grades
The Grades table comes pre-populated with a set of API pipe grades and selected Chromium grades. To view the details of any of these pre-installed grades, double-click on its row in the table.
A custom grade can be added by clicking on the "Add" button while the Grade list is open (or by clicking the Add Grade button on the toolbar). Doing so will produce an input screen where the well designer can specify all the parameters for the new grade. In addition to the parameters, the well designer can make notes regarding the newly defined grade. The required inputs are:
- Name of the Grade
- Minimum Yield Strength
- Maximum Yield Strength
- Tensile (Ultimate) Strength
Optionally, the user can specify the following, if known; if not, StrinGnosis® generates default values. The Radial, Axial, and Hoop parameters enable the user to describe an anisotropic material, and an optional Asymmetry factor can be provided to describe asymmetric anisotropic materials.
- Depth of Imperfection
- Fracture Toughness
- Burst Strength Factor
- Sigma Radial/span>
- Sigma Axial
- Sigma Hoop
- Asymmetry Factor
Finally, the user also has the ability to describe the temperature deration behavior of the material. For constant deration, a deration factor and reference temperature can be entered. For materials with non-linear temperature deration, the user can enable Custom Deration, at which point a table becomes enabled where the user can enter the values on the deration curve. The first column contains the temperature, the second column, the percentage reduction at that temperature.
The values in the custom deration table require an entry for the temperature at which the reduction is 100% – that is, no deration. StrinGnosis® will compute a value for this entry if none is entered, extrapolating upward based on the first two entries in the table. Subsequent values must be in order of increasing temperature.
Tip: if you are entering values for a grade, including custom deration values, and discover that some of the needed data is missing such that the deration values cannot be validated, there is no need to discard all the entered values. Simply uncheck the Custom Deration option, save the grade, and when the missing data is available, you can re-edit it and enter the custom deration information.
Connections
A custom connection can be added by clicking on the "Add" button while the Connections list is open. Doing so will produce an input screen where well designer can specify the parameters needed to define the new Connection.
The required inputs are:
- Name of the Connection
- Matching Pipe Data
- OD
- Weight
- Wall Thickness
- Grade
- Connection OD
- Connection ID
- Connection Ratings
- Tension
- Compression
- Burst
- Collapse
If Connection Usage Envelope data is available for the connection, the user can check the "Use CUE Data" box. This causes the CUE table to become enabled, and the user can enter the point values for the connection envelope. These points will then be plotted on the VME RAF curve of any section that uses that connection.
¶ Materials
Under this set of tabs, the well designer can examine what material property assumptions StrinGnosis® makes about the cement, the formation, and the tubulars. The Tubular Material properties are used in thermal and stress calculations; the formation and cement properties are used in thermal calculations.
Tubular Materials
The Tubular Materials tab on the materials manager shows the default values used by StrinGnosis® for steel properties. It also gives the user the means to create custom metals with user-defined values for these properties.
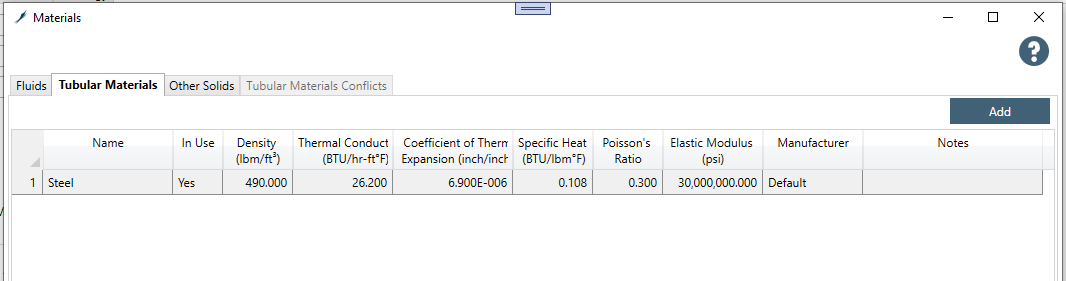
A new tubular material can be added by either clicking the Add button on the tab, or by clicking the Tubular Materials icon on the toolbar.
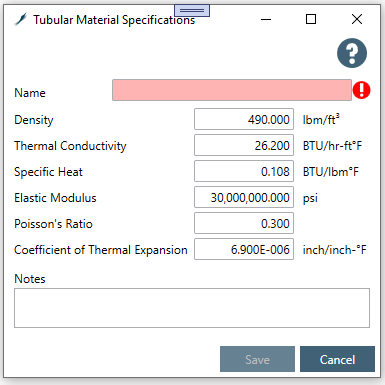
It is also possible to create a new tubular material by right-clicking on an existing one and selecting "Copy". A copy will be created which can then be modified as needed.
The table has a column titled "In Use" so the user can see at a glance which of the materials in the table is being used in the current project. This value is set to "Yes" when material is specified on a grade that is in use on any string section in the current project.
To use a user-defined tubular material, create a grade with the required properties. On the Grade input form there is a dropdown that will display all the custom tubular materials available to the project. Select the one required, then use that grade on the string section or in a connection.
Conflicted Materials
When StrinGnosis® reads in a project file, it compares each tubular material used in the project against those in the local database. If any material in the project file has the same name as one in the DB but different parameters, this is flagged as a conflict and a red Tubular Materials icon appears in the toolbar.
Until the conflict is resolved, StrinGnosis® uses the properties of the material described in the project file. The user can, however, resolve the conflict, by clicking on the red Tubular Materials icon or by opening the Materials manager from the Tools > Materials menu. The user can then either
- add the conflicted material to the database by selecting it and clicking the "Add to Database" button, or
- choose to use the DB version in the project instead (by selecting the database version from the Materials selection dropdown in the Grade used in the project).
The conflict can also be ignored. In this case, StrinGnosis® will use the version in the project file for all calculations on the project, and the metal will remain conflicted the next time the project is opened.
Fluids
The fluid manager shows the default fluid assumptions used by StrinGnosis®. It also gives the user the means to describe custom fluids with user-defined properties.
There are four fluid input tabs: Brines, Gels, Oil-Based Muds, and Water-Based Muds. In addition, a fifth tab lets the user examine and add Zamora coefficient sets which can then be referenced in brines, gels, and oil-based muds to define the density as a function of temperature and pressure.
Each table has a column titled "In Use" so the user can see at a glance which, if any, of the fluids in that table is being used in the current project. This marker gets set when a fluid is selected for use in an annulus in the casing program or as a circulating fluid in the Thermal Circulating case, and unset if the fluid is no longer in use on any string section or thermal case in the project.
At the top of each table are one or more non-editable default fluids, provided for convenience. These fluids displays the property assumptions that StrinGnosis® uses for that particular fluid type, if the user provides no other information.
To enter a custom fluid, either click the Add button in the upper right, or right-click to Copy an existing fluid. A copy will be created which can then be modified as needed.
All fluids require a value for a Zamora PVT function for the fluid's PVT properties. This Zamora function can be selected from the drop-down list in the fluid editing form. All Zamora functions defined in the database for the given fluid type are available for selection. The Density at STP column shows the nominal density for annular fluids, and the computed density at standard temperature and pressure on the Zamora table.
Brines and Gels
Brines and Gels are very similar to each other in terms of input properties. Their base fluid densities always track the nominal fluid densities, so the base fluid densities are not editable. The user can enter constants for plastic viscosity, yield point, specific heat, and thermal conductivity for both kinds of fluids.
Oil and Water-Based Muds
For oil- and water-based muds, the Thermal Conductivity and Specific Heat are computed from correlations that are functions of nominal fluid density, pressure, and temperature, and are therefore not editable.
Conflicted Fluids
When StrinGnosis® reads in a project file, it compares each fluid used in the project against those in the local database. If any fluid in the project file has the same name as one in the DB but different parameters, this is flagged as a conflict and a red Fluids icon appears in the toolbar.
Until the conflict is resolved, StrinGnosis® uses the fluid properties described in the project file. If no action is taken to resolve the conflict, the fluid remains conflicted the next time the project is opened. The user can, however, resolve the conflict, by clicking on the red fluid icon or by opening the fluid manager from the Tools > Materials menu.
The four tabs on the far right of the Fluids tab display the conflicts for the four types of fluids. The user can either add the conflicted fluid to the DB by selecting the fluid and clicking the "Add to Database" button, or choose to use the DB version in the project instead (by selecting the DB version from the fluids selection dropdown in the casing program or circulating case). Or the conflict can be ignored; StrinGnosis® will use the version in the project file for all calculations on the project.